Nest.js 프로젝트 생성과 구조
Nest.js 백엔드 개발· 1 / 8
Node.js를 공부하면서 웹서버 프레임워크를 알아보던 중 Nest.js를 알게 되었다. Express.js와는 달리 프레임워크의 무게감이 있지만, Nest.js만의 철저(?)한 규칙과 다양한 내부 기능으로 다른 Node.js 웹서버 프레임워크들과 비교해 서버 개발에 안정감과 코드관리가 용이하다는 특징이 있다고 한다.
Nest.js는 웹개발에 필요한 대부분의 기능이 이미 준비되어 있고 개발 로직에 규칙이 존재한다. 처음 백엔드 웹개발을 시작했을 때 접했던 Python Django와 유사한 면이 많다고 느껴졌다. 접해보진 못했지만 Java의 Spring Boot와도 유사한 점이 많다는 의견이 있다.
Nest.js의 특징인 의존성 주입, TypeScript 사용, ORM 지원 등 기존에 공부해보고 싶었던 다양한 개념을 함께 공부하기에 좋은 기회라고 생각해 Nest.js를 백엔드로 토이프로젝트를 시작했다.
Nest.js 설치와 프로젝트 생성
Nest.js는 기본적으로 Node.js 런타임에서 실행되는 프레임워크이기에 Node.js가 설치되어 있어야 한다.
설치
npm install -g @nestjs/clinestjs/cli는 Nest.js 관련 명령어를 실행할 수 있는 ‘커맨드 라인 인터페이스’ 도구이다. 이 도구를 이용해 터미널에서 “nest”라는 명령어를 사용할 수 있다.
프로젝트 생성
nest new project-nameproject-name 에 입력한 이름으로 프로젝트 디렉토리가 생성되고 동시에 아래 리스트의 패키지가 모두 설치된다. 설치된 Nest.js의 버전은 v9.3.9이다.
├── @nestjs/[email protected]
├── @nestjs/[email protected]
├── @nestjs/[email protected]
├── @nestjs/[email protected]
├── @nestjs/[email protected]
├── @nestjs/[email protected]
├── @nestjs/[email protected]
├── @types/[email protected]
├── @types/[email protected]
├── @types/[email protected]
├── @types/[email protected]
├── @typescript-eslint/[email protected]
├── @typescript-eslint/[email protected]
├── [email protected]
├── [email protected]
├── [email protected]
├── [email protected]
├── [email protected]
├── [email protected]
├── [email protected]
├── [email protected]
├── [email protected]
├── [email protected]
├── [email protected]
├── [email protected]
├── [email protected]
└── [email protected]
프로젝트 구조
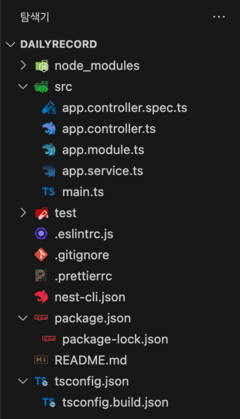
main.ts: 진입점 파일로 NestFactory를 사용하여 애플리케이션을 생성하고 서버를 실행함.
app.module.ts: 프로젝트 내 모든 모듈의 루트 모듈로서 다른 모듈들을 조직하는 역할을 함.
app.controller.ts: 라우팅을 처리하고, 클라이언트로부터의 HTTP 요청을 받아 적절한 서비스에 전달하는 역할을 함.
app.service.ts: 컨트롤러로부터 요청을 받아 처리하는 비즈니스 로직을 담당함.
그 외 설정 파일
.nest-cli.json: Nest.js 프로젝트에서 CLI의 동작 방식을 설정할 수 있는 파일.
package.json: 프로젝트의 메타데이터와 의존성 정보를 담고 있는 파일.
tsconfig.json: TypeScript 컴파일러의 동작을 제어하는 설정 파일.
.gitignore: Git 버전 관리 시, 제외할 파일 및 디렉토리 목록을 지정하는 설정 파일.
.eslintrc.js: ESLint 구성 파일로, 코드 품질 관리와 코딩 규칙을 따르도록 돕는 파일.
.prettierrc: Prettier 구성 파일로, 코드 포맷팅 스타일을 지정하는 설정 파일.
앱 생성
Nest.js CLI에는 generate라는 파일 생성 명령어가 있다. 파일의 역할에 맞는 코드가 미리 작성되어 있는 파일을 생성해 빠르게 코드의 프레임 구조를 잡을 수 있다.
터미널에 nest를 입력하면 generate로 생성할 수 있는 명령어 리스트를 확인할 수 있다.
nest
┌───────────────┬─────────────┬──────────────────────────────────────────────┐
│ name          │ alias       │ description                                  │
│ application   │ application │ Generate a new application workspace         │
│ class         │ cl          │ Generate a new class                         │
│ configuration │ config      │ Generate a CLI configuration file            │
│ controller    │ co          │ Generate a controller declaration            │
│ decorator     │ d           │ Generate a custom decorator                  │
│ filter        │ f           │ Generate a filter declaration                │
│ gateway       │ ga          │ Generate a gateway declaration               │
│ guard         │ gu          │ Generate a guard declaration                 │
│ interceptor   │ itc         │ Generate an interceptor declaration          │
│ interface     │ itf         │ Generate an interface                        │
│ middleware    │ mi          │ Generate a middleware declaration            │
│ module        │ mo          │ Generate a module declaration                │
│ pipe          │ pi          │ Generate a pipe declaration                  │
│ provider      │ pr          │ Generate a provider declaration              │
│ resolver      │ r           │ Generate a GraphQL resolver declaration      │
│ service       │ s           │ Generate a service declaration               │
│ library       │ lib         │ Generate a new library within a monorepo     │
│ sub-app       │ app         │ Generate a new application within a monorepo │
│ resource      │ res         │ Generate a new CRUD resource                 │
└───────────────┴─────────────┴──────────────────────────────────────────────┘
하나의 앱은 기본적으로 Module, Controller, Service 구조로 이루어진다. nest generate를 이용해 각각의 파일을 생성해 앱을 구성해보자.
# Module 생성
nest g mo user

# Controller 생성
nest g co user

# Service 생성
nest g s user-
user.module.tsimport { Module } from '@nestjs/common'; import { UserController } from './user.controller'; import { UserService } from './user.service'; @Module({ controllers: [UserController], providers: [UserService], }) export class UserModule {} -
user.controller.tsimport { Controller } from '@nestjs/common'; @Controller('user') export class UserController {} -
user.service.tsimport { Injectable } from '@nestjs/common'; @Injectable() export class UserService {}
이렇게 기능별로 앱을 생성해 관리하고 모듈 간의 의존성을 최소화하고 재사용/확장이 용이하도록 프로젝트를 구성하는 것이 Nest.js의 기본 체계다.
프로젝트 디렉토리 구조
Nest.js는 기본적으로 기능별 app별로 파일을 구성합니다. 기본 구조를 수용하며 확장한 저의 Nest.js 프로젝트 디렉토리 구조는 아래와 같습니다.
src
├─ app → 기능성 모듈(module, controller, service)
│  ├─ user
│  ├─ auth
│  ├─ category
│  └─ ...
│
└─ shared
   ├─ interceptors → HTTP 요청/응답 관련 인터셉터 파일
   ├─ filters → 예외 처리 필터 파일
   ├─ guards → 라우팅 엔드포인트의 접근을 제어하는 가드 파일
   ├─ strategies → 인증 라이브러리와 함께 사용되는 인증 전략 파일
   ├─ decorators → 메타데이터를 추가 및 기능 확장하는 데 사용되는 데코레이터 파일
   ├─ dto → DTO 파일
   ├─ entities → 데이터베이스 엔티티 파일
   ├─ services → 부가적인 비즈니스 로직을 담당하는 서비스 헬퍼 파일
   ├─ templates → HTML 템플릿 파일
   ├─ types → 타입 설정 파일
   │  ├─ enums
   │  └─ interfaces
   │
   ├─ utilities → 유틸리티 단순 기능 파일
   ├─ config → 설정 파일
   └─ constants → 상수 파일
주요 기능
Nest.js가 기본으로 제공하는 대표 기능 몇 가지를 살펴본다.
Decorator
Nest.js에서는 내장으로 TypeScript의 기능 중 하나인 데코레이터를 지원합니다. 클래스, 메소드, 프로퍼티, 파라미터 각 요소에 메타데이터를 부여하고 기능을 추가함으로써 더욱 유연하게 코드를 작성할 수 있습니다.
의존성 주입
Nest.js은 클래스 기반 객체 지향 프로그래밍을 지원하며 의존성 주입을 기본 방식으로 사용합니다. 모듈 시스템을 통해 의존성을 관리하고, 의존성 주입 컨테이너를 이용해 컨트롤러, 서비스, 미들웨어 등 다양한 클래스를 서로 연결합니다.
HTTP exceptions
Nest.js에서는 내장된 exception 클래스를 사용하여 HTTP 예외처리를 간편하게 처리할 수 있습니다. 사용하는 클래스에 따라 Status Code가 지정되며, 인자값으로 메세지를 전달할 수 있습니다.
참고 자료
- [1] Nest.js 공식 문서↗